Achieving Air Tightness - 36
Make sure it's properly sealed up to ensure your home is airtight, writes Mark Stephens.
You've been told many times about the need to insulate your home to a high standard. This is indeed by far the most cost-effective way to lower your fuel bills, not to mention comply with the energy requirements of the building regulations. But insulation and airtightness go hand in hand. After the insulation is fitted, an airtight membrane/ vapour control layer must be applied to the warm side of the insulation, otherwise all the hard work you put into insulating and protecting your home will literally leak at the seams! Airtightness, or 'air-flow-control' (a term that takes into account the risk of condensation as well the air exchange rate), is often associated with highly energy-efficient homes. But that's not always the case. In fact, you can make your house airtight with standard trickle vents, or 'hole in the wall’ ventilation. With regards to the building regulations, it doesn't matter which ventilation system you choose because during the airtightness test all of the vents, extracts (be they mechanical ventilation, trickle vents, passive stack, etc.) and chimneys are required to be sealed. But be aware that too little ventilation in an airtight home will invariably lead to moisture and mould problems. Where there is no mechanical ventilation, the wall vents are the only means of moisture management and this may not suffice! When sealing the building envelope to achieve a good airtightness standard the moisture generated in the home (as well as airborne pollutants/gases) requires a direct exit through mechanical ventilation or wall ventilation in each room. So if you are only relying on trickle vents for ventilation, it is good practice to open your windows to the front and rear of the home for 30 minutes two to three times a day as this will clear moisture from the building.
Your 'airtightness strategy' will need to be conducted very early on in the process and take into consideration moisture management. It is essential that all members of the construction team understand the process involved in maintaining airtightness; it's very easy for an electrician for example to cut an opening in the airtightness membrane for his cable without then resealing it. It is therefore highly recommended that your builder ensures that every subcontractor on site understands the process. And if you are a self builder it is up to you to ensure that your subcontractors seal any penetrations as they go, otherwise the end result is likely to be poor and require remedial works to pass the regulatory standards currently applicable.
The first step is to take pen to paper. Get the plans of your building and place a pen at a start point of your choosing (internally on the section) and then draw a continuous line around the entire building where you will have a continuous airtight envelope. Any potential air leaks are when you have to pick your pen up from the paper, and as you may have guessed, particularly prevalent areas for air leakage are dormer windows, roof lights, windows, doors, junctions between floors and walls, loft hatches, etc. The rules for creating airtight seals at such junctions are as follows:
• When the membrane meets a block wall (at a gable end for example) you will need to use a proprietary mastic to seal the edge of the membrane to the blockwork. It is important to emphasise that standard cavity blockwork is not airtight until it is plastered. Therefore it is recommended that the blockwork is plastered with a scratch coat prior to using the mastic.
• Where the membrane overlaps or meets a smooth or hard surface, you can seal the membrane using proprietary tape.
Remember to think about every single section of your building. It's easy to see that your pen would lift off the paper when a floor meets a wall; this is another critical junction and the solution for maintaining airtightness depends on the type of floor construction. For a hollow core floor it is recommended that a section of airtightness membrane be laid on top of the wall on which it is to be placed. The membrane then wraps up the side and over the top of the hollow core flooring; the blockwork for the upper floor is then laid on top of the membrane. This section of 'wrapping' membrane is then fixed to the wall or vertical membrane. In the case of a timber floor, you have two alternatives. You can either use the hollow core floor technique or you can use tape to seal around each Joist to a plastered wall.
In the case of timber frame construction, you will have to fix an airtight membrane internally on the entire envelope. In standard plastered blockwork, cavity walls are typically considered to be airtight as long as they are plastered externally and internally with a minimum of two coats (scratch and finish). Potential air leakages occur where the walls are penetrated (with doors and windows for example) and adequate airtight sealing has not been considered at these junctions.
As for cavity blockwork construction-it is now common practice to insulate walls internally with insulated plasterboard (normally a 50mm board with 38mm insulation and 13mm plasterboard) but this may not necessarily be airtight as the junctions between the boards may not be sealed adequately: a skim coat does not provide an airtight barrier, nor does plasterboard tape!
The solution therefore is to scratch coat the blockwork walls first and then fix the insulated plasterboard. You will still need to pay particular care at window and door reveals to ensure the airtight barrier is maintained by applying an airtight seal or using proprietary tapes. The main thing to remember is that your structure is not airtight at junctions where you are only relying on the thickness of the finishing coat of plaster.
An alternative method for applying an airtight barrier to a cavity blockwork construction is to apply a similar technique to a timber frame wall. That is to batten the unplastered internal blockwork wall and then to apply the airtight membrane to the battens. As well as creating an airtight envelope you are also creating a cavity for any services such as electrics or plumbing, thereby eliminating any chasing. The final stage then is to apply the membrane over a cross-batten and then plasterboard and skim.
While mould growth used to be associated with badly insulated homes, now it's often due to airtight homes with poor ventilation
What the building regulations say.
Building a home that is airtight will not only improve comfort, it's also an essential component of the building regulations'. It is now a legal requirement for any new house to be air-pressure tested; both ROI and NI currently have the same air permeability requirement of l0m3/(h.m2) at 50Pa. This figure basically says that an air leakage of no more than 10m3 per hour per m2 of building envelope area (at a pressure differential of 50 Pascal between inside and outside the building), is permitted". Compliance is verified by doing a blower door test; this is where a door or window is removed and replaced with a blower fan. The house is then pressurised (both positively and negatively) to measure the air leakage from the airflow rate through the fan. This identifies the pressure difference between the inside and outside of the building structure. The bigger the number the worse the result; greater than 10 fails the building regulations, less than five is doing well, less than three is quite good. Bear in mind that the airtightness results will have a significant impact on the A to G rating you will get under your Energy Performance Certificate / Building Energy Rating.
*In ROI refer to building regulations' technical guidance document Part L and in NI the building regulations' F1 booklet.
**Air Permeability (q50) and Air Changes per Hour (n50) are two different measures: air changes are based on the volume 01 the building instead 01 the envelope area. Air changes are often quoted to demonstrate the airtightness 01 a building but this is not the measure used by the building regulations.
Illustrated guide - Airtight Walls
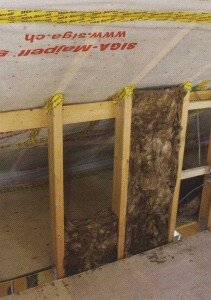
At the floor junction, note how the membrane continues and is sealed down to the floor: the critical Junctions when fixing the membrane using this method occur where the membrane meets a penetration such as an opening or where it meets another material such as at a floor or a gable.
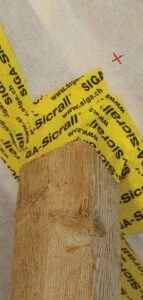
Roof member/beam: Detail showing how to seal around a roof member to the airtightness membrane.
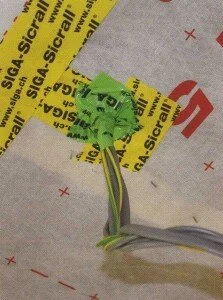
Cables: You will need to comprehensively seal every cable penetration to ensure airtightness. Some manufacturers provide a specialist tape that is more supple and easier to fold around cables than the standard, thicker tape.
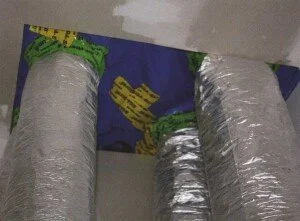
Ventilation: Here we see the sealing around the pipework for a mechanical heat recovery ventilation system in the ceiling; this applies to all sorts of piping (vents, water, etc.).
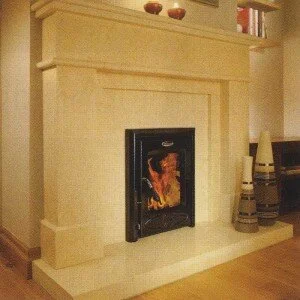
Open fires: A standard open fireplace is frowned upon in an airtight construction: at best an open fire is only 5%-20% efficient and even a multi-fuel stove will extract some of the heated air in the room in order to ignite the fire. Therefore in a 'super airtight' house, you must ensure that the air which feeds the fire comes from the outside; you can now obtain specifically designed multi-fuel stoves that address this issue.